CSS Z-index
The z-index property in CSS controls the stacking order of elements on a webpage. Elements with a higher z-index value are displayed in front of those with a lower z-index value.
Default Stacking Order
By default, elements are stacked in the following order:
- Root element (the <html> element)
- Non-positioned elements in the order they are defined
- Positioned elements in the order they are defined
Non-positioned elements are those with the default position value of "static", while positioned elements have any other position value (e.g., "absolute", "relative", "sticky", or "fixed").
HTML:
    <!-- Example HTML -->
    <div class="pink">
      <div class="orange"></div>
    </div>
    <div class="blue"></div>
    <div class="green"></div>
CSS:
    /* Example CSS */
    .blue, .pink, .orange {
      position: absolute; /* Positioning required for z-index */
    }
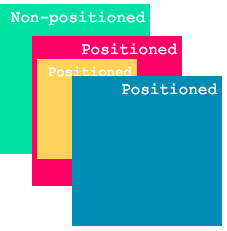
Even though the green box is defined last in the document, it appears behind the others because it is non-positioned.
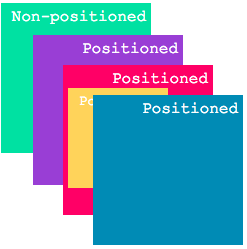
Stacking with Z-index
To change the stacking order of elements, we can use the z-index property. An element with a higher z-index will be displayed in front of an element with a lower z-index. However, z-index only works with positioned elements.
  /* Example CSS */
  .blue { z-index: 2; }
  .orange { z-index: 3; }
  .green { z-index: 100; /* has no effect */ }

The orange box, with a higher z-index, is displayed in front of the blue box.
Stacking Context
Adding a z-index value to an element creates a stacking context, affecting how its child elements are displayed.
HTML:
  <!-- Example HTML -->
  <div class="pink">
    <div class="orange"></div>
  </div>
  <div class="blue"></div>
  <div class="purple"></div>
  <div class="green"></div>
CSS:
  /* Example CSS */
  .blue, .pink, .orange, .purple {
    position: absolute; /* Positioning required for z-index */
  }
  .purple { z-index: 0; }
  .pink { z-index: 1; }
  .blue { z-index: 2; }
  .orange { z-index: 3; }
  .green { z-index: 100; }
The pink box is displayed in front of the purple box. However, the orange box, even with a higher z-index, is behind the blue one because they are in different stacking contexts.
Stacking contexts are formed not only by z-index but also by other properties like filter, opacity, and transform.
HTML:
  <!-- Example HTML -->
  <div class="pink">
    <div class="orange"></div>
  </div>
  <div class="blue"></div>
  <div class="green"></div>
CSS:
  /* Example CSS */
  .blue, .pink, .orange {
    position: absolute; /* Positioning required for z-index */
  }
  .pink { filter: hue-rotate(20deg); }
  .blue { z-index: 2; }
  .orange { z-index: 3; }
  .green { z-index: 100; }

The orange box still has a higher z-index than the blue one but is displayed behind it because the filter property caused the pink box to form a new stacking context.
Exercise: Layering and Stacking Challenge
Now it's your turn to put your knowledge into practice! In this exercise, you will create a layered design using z-index and explore the impact of stacking contexts.
- Create a simple HTML structure with multiple div elements representing different layers of your design.
- Apply positioning (e.g., absolute, relative) and z-index values to create a layered effect.
- Experiment with different z-index values to change the stacking order and observe how the layers overlap.
- Create a visually appealing composition by playing with colors, sizes, and positioning.
- Challenge yourself by creating a complex design with multiple stacking contexts and overlapping elements.
Remember to refer to the concepts and examples covered in this tutorial as you work through the exercise. Happy coding and have fun exploring the world of layering and stacking!